


If you are wondering about the perfect gift for an expecting mom, wonder no longer. Why not consider a diaper cake? They are cute, full of goodies, practical, homemade, and can often be the centerpiece at the shower. You can even customize them to match the theme of a nursery. Anytime I know someone who is expecting, I whip one of these up. On average they cost roughly $50 to put together, which can be split between several people to split up the cost. Here is what you need:
“Ingredients”
- 1 Pack of Diapers (70-80 count box is about right)

- Travel size wipes, soaps, lotion, baby powder, tissues, hand sanitizer. All those little goodies that will be great in the diaper bag.
- Diaper Cream
- Bobby Pins
- Three receiving blankets (here is where you can customize to gender and or nursery theme)
- A package of pacifiers
- Baby comb and brush
- A small dowel
- A cardboard square or cake round
- A small toy or pair of shoes
- Rubber bands
- Ribbons
- Hot glue and hot glue gun
Directions:
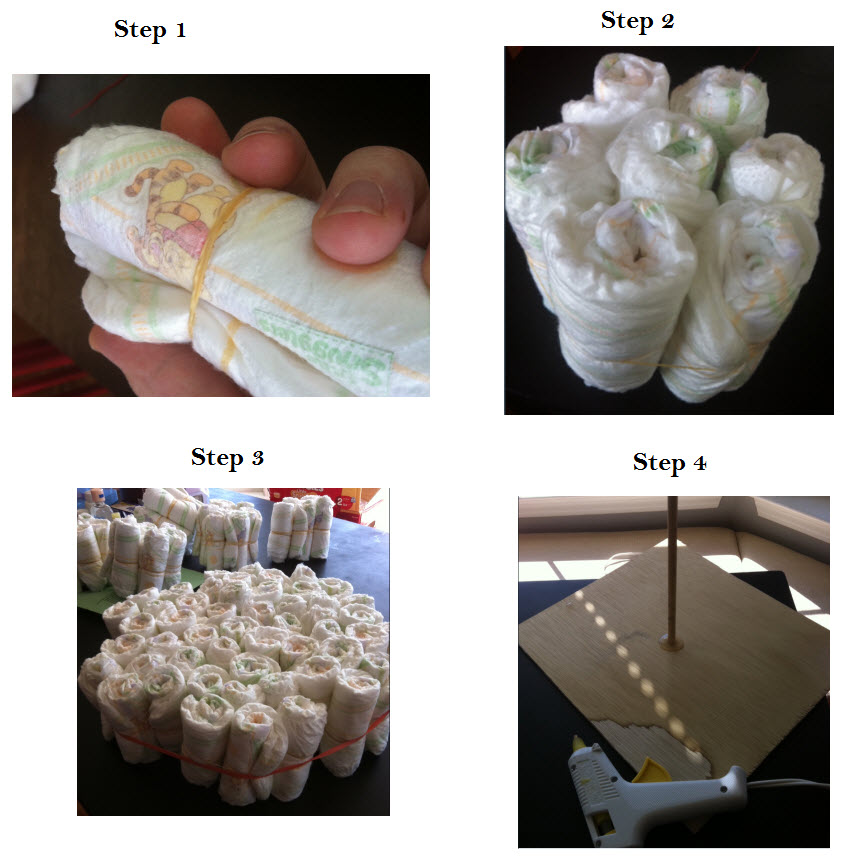
- Step one, rip open that box of diapers. Take each diaper and roll them up, starting with the crotch end and rubber band it so it stays. Repeat with all of the diapers. This is by far the most tedious part of the project. (See photo 1)
- Next you take seven rolled diapers and gather them into what my daughter calls a flower and rubber band that together. (See photo 2) One of these bundles will be the top tier of your diaper cake, three the middle tier, and the rest make the bottom.
- After finishing bundling and rubber banding all of the diapers into bundles use a piece of ribbon, or string to gather three bundles together for your middle tier. Set one aside for the top, then gather the remaining bundles and tie them together. (Photo 3)
- Next take your cardboard and dowel and glue the dowel in the center using hot glue. (Photo 4)
- Now it’s time to put everything together. Slide the bottom tier around your dowel and make sure it is centered on the cake round. Carefully remove individual diapers and replace them with some of your travel sized goodies. Keep the goodies towards the middle so they cannot be seen and can remain hidden. When you remove a diaper from the middle, you can add it back on the outside to ensure a round shape. When you finish with the bottom tier do the same for the second. All of your little surprises should be in the bottom two tiers, leaving the top tier all diapers.
- The next step is to take the receiving blankets and wrap them around the layers just like frosting. It’s helpful to have someone else lend a hand here. Pull the blankets tightly around each layer, have someone hold it tight (or use the bobby pins) then tie a ribbon around it to secure it in place. Align the bow so it matches up with the place where the receiving blanket seams are. Follow the same step for the remaining tiers. Line up all your bows in the back. Don’t be afraid to let the bows flow and hang. It’s looks cute.
- Next is to take all the cute little stuff that you bought to decorate and attach it to the cake. The shoes or small toys make a great topper for the cake. You can use ribbon to tie the item to the dowel. Usually I use a dab of hot glue to secure the ribbon to the dowel for extra stability. To secure the rest of the items, use your ribbons or perhaps some bobby pins.
- Finally, you have finished making a homemade practical diaper cake that any mom-to-be will adore!
-Stephanie Wright