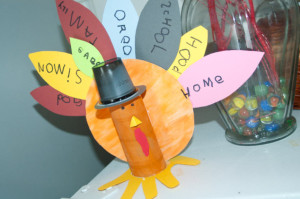
I am so excited for Thanksgiving this year. Well, actually I am always excited for Thanksgiving. I am all about the turkey, the plethora of sides, and of course the pies! This year is especially fun because my kids are old enough to really start to enjoy the ideas behind the holiday. My two year old doesn’t quite understand about pilgrims or Indians, but he gets saying thank you! My five year old has had a blast learning little bits about the first Thanksgiving Feast and all that went along with it. She is quite the little artist, so as you can imagine we have done tons of little crafts associated with Thanksgiving. All have been centered around things that she is thankful for. First we made a “Thankful Turkey.”
Here is what you will need:
- Pencils
- Orange paint
- Heavy white card stock
- Empty toilet paper roll
- Construction paper in various fall colors
- A small black plastic ramekin (We used an empty, cleaned Kourig K-cup!)
- White glue
- Your child and their hand
- Scissors
- Black marker
Instructions:
- First thing you want to do is cut your card stock into two circles. We used salad bowls to trace the size of the circles on and then cut them out.
- Next let your child paint the two circles, and the toilet paper roll orange.
- While those are drying it’s time to make your turkey feet. With a piece of construction paper, preferably yellow or orange trace your child’s hand. Cut it out. I let my daughter write her name on the bottom and the year so we can always remember.
- Gather a bunch of your construction paper and cut out leaf shapes. On each leaf let your child (or you can if they aren’t writing yet!) write something that they are thankful for. My daughter came up with the cutest things, family, school, the dog, her brothers etc. My son, well he was thankful for milk, cookies, and blocks. What can I say? He’s two.
- At this point you can take your black ramekin (or k-cup) and turn it into a hat. Use the glue to attach it to a piece of coordinating construction paper that has been cut into a circle about a quarter of an inch larger than the cup. Set it aside to dry
- Hopefully by now all of your paint is dry. If it’s not, wait, if it is lets get building! Take one of your orange circles and lay it down paint side down. Glue the tips of each feather across the top half of the circle.
- Glue the second circle, paint side up, on top of the first circle and it’s feathers. Let it dry.
- Finally, take that toilet paper roll (again hopefully dry) and glue it to the circles and feathers. Be sure the line up the bottom of the roll with the bottom of the circles. They should be even.
- Glue the cut out of your child’s hand to the bottom of the toilet paper roll. Your turkey should now be able to stand up!
- Now you can use markers, or more construction paper to make a face for your turkey.
- Finally, glue the hat on the turkey’s head.
- Display for everyone to see!
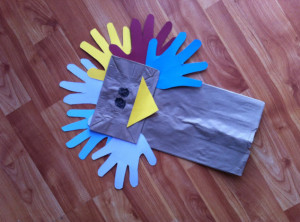
The other craft that my family had a blast with is another turkey (big surprise!). This time a turkey puppet. We used:
- Brown Paper bags
- Scissors
- Glue
- Construction paper
Instructions:
- First you trace out your child’s hand (or let them do it if they are old enough) on lots of different pieces of construction paper.
- Cut them all out.
- Glue the hands to the brown paper bag in a way that resembles feathers.
- Use construction paper to finish the face.
And there you have it folks, two deliciously easy Thanksgiving crafts sure to keep you and your kiddos busy. Even better, get the supplies ready and let the kids put them together on Thanksgiving day while you are finishing preparing the big feast. You can use the Turkeys as your table centerpiece. And hopefully the puppets can buy you some time while the kids play with them. Double win!
Thankful Turkey
Paper Turkey
-Stephanie Wright


